
導入
ESP32で電圧を計測するという記事を以前を書きましたが、今回はそのコードを使ってAppleのホームアプリ(HomebridgeでHomekit化)から見れるようにしてみました。
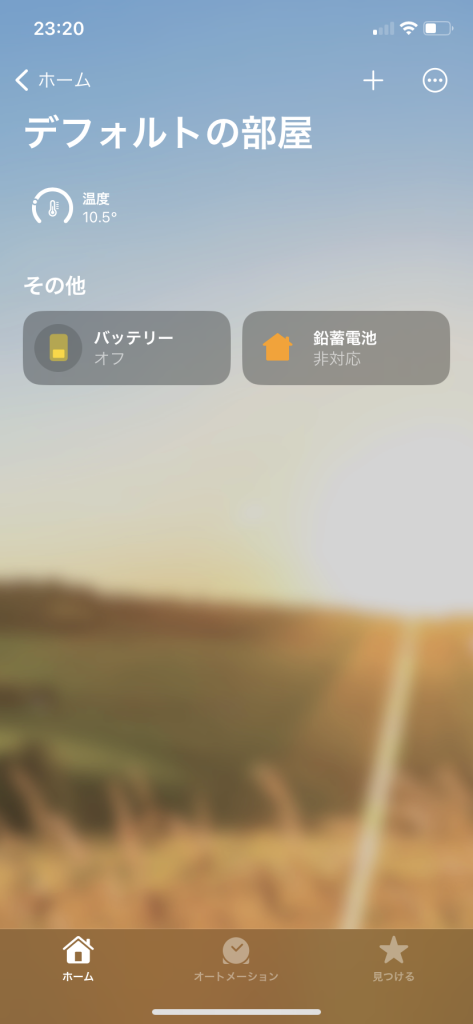
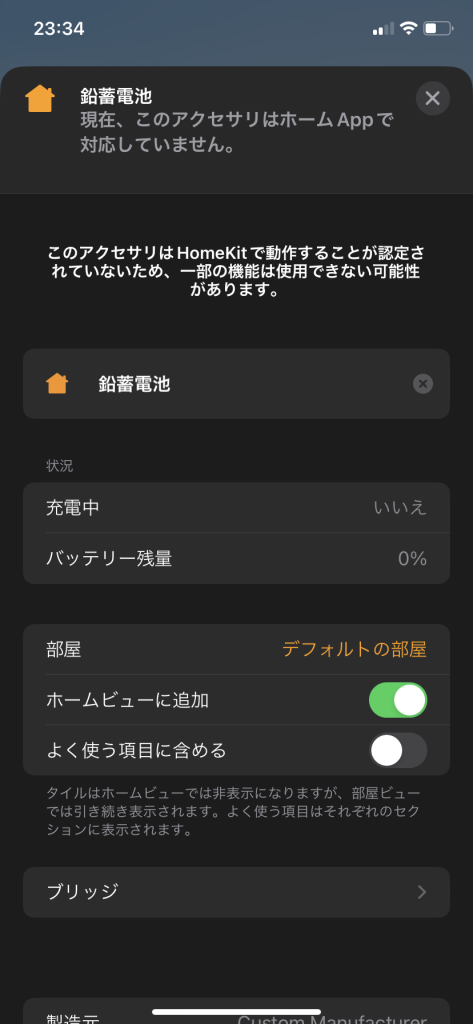
ただ、今回は完成途中ということでちょっと難ありです。電圧は温度計として(Homekitには電圧の表示機能がないため)、放電のON/OFFはスイッチとして、残量の%や低電圧状態かはバッテリーとして確認できます
ESP32のコード
以前の記事のESP32のADCを使用して電圧を測定するとESP32でマルチコアを使用するを組み合わせて作成してます。AruduinoJSONを使用しているのでライブラリの追加を行なってください。スケッチ>ライブラリをインクルード>ライブラリを管理...の検索欄にAruduinoJSONと打ち込んでインストールしてください。
#include <WiFi.h>
#include <ArduinoJson.h>

//電圧測定の設定
const int R1 = 510; //プラス側の抵抗値
const int R2 = 100; //マイナス側の抵抗値
const float inV1 = 4; //校正に使用した電圧
const float ESP32ValueV1 = 4.12;//校正に使用した電圧の表示値
const float inV2 = 15; //校正に使用した電圧
const float ESP32ValueV2 = 17.93;//校正に使用した電圧の表示値
float voltage = 0;
int sumV = 0;
volatile int average_count = 0; //平均を何回加算したか
volatile float average_voltage = 0; //平均を加算したもの
float result_voltage = 0; //最終的に表示される電圧

//pinの設定
const int inpin = 33; //電圧測定ピン
const int switchPin = 18; //リレーの端子
const int BOOT_SW = 0; //DevKit上のBOOTボタン
const int Blue_LED = 2; //DevKit上の青色LED

//電圧の計測用の計算 読み取り値=katamuki*入力値+seppenn を計算する
const float katamuki = (ESP32ValueV2 - ESP32ValueV1) / (inV2 - inV1); //傾きの算出
const float seppenn = ESP32ValueV1 - (katamuki * inV1); //切片の算出
const float Xsettenn = - seppenn / katamuki; //X軸との交点

//WiFi関係と固定アドレスなどの設定
const char SSID[] = "WiFiSSID"; //SSID
const char PASSWORD[] = "WiFipassword"; //WiFiパスワード
WiFiServer server(80);
IPAddress ip(192, 168, 10, 12);        // for fixed IP Address
IPAddress gateway(192,168, 10, 1);    //
IPAddress subnet(255, 255, 255, 0);  //
IPAddress DNS(192, 168, 10, 1);       //

//内部値
volatile int command = 0;      //0:OFF,1:ON,2:on/off-status,3:vpltage,5:info
//volatile int switchcommand = 0; //0:OFF,2:ON
volatile int flag = 2; //ONで1、OFFで0、低電圧で2
int Button_flag = 1;
int oldButton_flag = 1;
int countanalog = 1; //平均値を取るための回数

//接続してきたクライアントのコマンドを取り込むバッファなどの用意
#define BUFFLEN 256   //length of the receive buffer
char buff[BUFFLEN]; //buffer
int count = 0;        //counter for the buffer
bool isBlankLine = false; //if the last line is empty, the end of request
int number = 0;

//クライアントから受け取った1バイトをバッファに溜めてGETコマンドをチェックする
//リクエスト行が空行ならば、リクエストは終了と判断してisBlankLineに反映する
//put received char in buffer and check the GET command and empty line
void processReequest(char c) {
  if(c == '\r') return; //if the code is CR, ignore it
  if(c == '\n') {  //if the code is NL, read the GET request
    buff[count]='\0'; //put null character at the end

    String buffS = buff; //convert to String
    //Serial.print("command is: "); //for debug
    //Serial.println(bufferS);      //for degub
    if(buffS.startsWith("GET /off")){ //offコマンドの時
      command = 0;
    }
    else if(buffS.startsWith("GET /onoff_status")){ //バッテリーを使用しているか否か
      command = 2;
    }
    else if(buffS.startsWith("GET /on")){ //onコマンドの時
      command = 1;
    }
    else if(buffS.startsWith("GET /voltage")){ //バッテリー電圧の確認
      command = 3;
    }
    else if(buffS.startsWith("GET /status")){
      command = 4;
    }
    /*else if(command == 5){ //このデバイスについての説明文表示
      command = 5;
    }*/

    //Serial.print("command = ");
    //Serial.println(command);
    isBlankLine = (count == 0); //and check if the line is empty
    count=0;
  }
  else { //if the code is not control code, record it
    isBlankLine = false;
    if(count >= (BUFFLEN - 1) ) count=0; //if almost overflow, reset the counter
      buff[count++]=c; //add char at the end of buffer
    }
  }

//最初に実行される関数
void setup() {
  int status = WL_IDLE_STATUS;
  int wifi_led_flag = 0;
  pinMode(Blue_LED, OUTPUT);
  pinMode(switchPin, OUTPUT);
  pinMode(inpin, ANALOG);
  Serial.begin(115200);               //  シリアル通信のボーレートを115200に設定
  while (!Serial) ;                   //  wait for serial port to connect.
  WiFi.config(ip, gateway, subnet, DNS);   // Set fixed IP address

  while (status != WL_CONNECTED) {
    Serial.print("\nAttempting to connect to SSID: ");
    Serial.print(SSID);
    WiFi.begin(SSID, PASSWORD);
    for (int i=0; i<15; i++) { //wait up to 15 sec to be connected
      delay(1000);
      status = WiFi.status();
      Serial.print(".");
      if(wifi_led_flag == 0){
        digitalWrite(Blue_LED, HIGH);
        wifi_led_flag = 1;}
      else{
        digitalWrite(Blue_LED, LOW);
        wifi_led_flag =0;}
      if(status == WL_CONNECTED){
        digitalWrite(Blue_LED, LOW);
        break;}
    }
  }

  xTaskCreatePinnedToCore(task0, "Task0", 4096, NULL, 1, NULL, 0); //マルチコアの始動
}

void task0(void* arg){
  server.begin(); //start the server
  Serial.print("\nHTTP server started at: ");
  Serial.println(WiFi.localIP());
  while(1){
  WiFiClient client = server.available();
  if (client) {
    //Serial.println("new client");
    number = 0;
    while(client.connected()) {
      if(client.available()) {
        char c = client.read();
        //Serial.write(c);
        processReequest(c);
        //if the line is blank, the request has ended.
        if(isBlankLine) {
          // httpで送信
          if (command == 0 || command == 1 || command == 2|| command == 5){
            //空行ならばリクエスト終了と判断して応答
            client.println("HTTP/1.1 200 OK");
            client.println("Content-Type: text/html");
            client.println("Connection: close");  // the connection will be closed
            client.println();
            client.println("");
            client.println("");
            if (command == 0){ //OFF
              client.print(flag);
            }
            else if (command == 1){ //ON
              client.print(flag);
            }
            else if (command == 2){ //スイッチのステータス
              if (flag == 0 || flag == 2){ //OFF時
                client.print(0);
              }
              else if (flag == 1){ //ON時
                client.print(1);
              }
            }
            else if (command == 5){ //info
              client.print("http://");
              client.print(ip);
              client.print("/on will on,/off will off,/onoff_status will 0 or 1,/voltage will return voltage.");
            }
            client.println("");
            client.println("");
          }

          //JSON形式で送信
          if (command == 3 || command == 4){ //voltageとstatus
            StaticJsonDocument<256> doc;
            Serial.print("avevol  ");
            Serial.println(average_voltage);
            Serial.print("countvol");
            Serial.println(average_count);
            if (average_count >= 10){ //平均値の計算
              result_voltage = average_voltage / average_count;
              Serial.print("resulvol");
              Serial.println(result_voltage);
              average_voltage = 0;
              average_count = 0;
            }
            if (command == 3){ //voltageの返答
              doc["temperature"] = result_voltage;
            }
            if (command == 4){ //Statusへのレスポンス
              if ((result_voltage - 10.5) >= 3){ //13.5V以上の時
                doc["BatteryLevel"] = 100;
              }
              else if (result_voltage <= 10.5){
                doc["BatteryLevel"] = 0;
              }
              else{ //13.5V以下の時
                doc["BatteryLevel"] = 100 * (result_voltage - 10.5)/ 3;
              }
              if (flag == 2){ //放電可能か?
                doc["LowBattery"] = 1;
              }
              else{
                doc["LowBattery"] = 0;
              }
            }
            //Serial.print(F("Sending: "));
            //serializeJson(doc, Serial);
            //Serial.println();

            client.println(F("HTTP/1.0 200 OK"));
            client.println(F("Content-Type: application/json"));
            client.println(F("Connection: close"));
            client.print(F("Content-Length: "));
            client.println(measureJsonPretty(doc));
            client.println();
            serializeJsonPretty(doc, client);
          }
          //command = 5;
          break;
        }
      }
    }
  }
  delay(1);
  }
}

//繰り返し呼び出される関数
void loop() {
  sumV = sumV + analogRead(inpin); //inpinの値を読み込む
  countanalog++;
  //Serial.println(pinrawV);
  if (countanalog == 1000){
    float pinrawV = sumV / 1000;
    sumV = 0;
    countanalog = 0;
    voltage = (pinrawV * (R1 + R2) / (R2 * 1000) - seppenn) / katamuki; //電圧の計算
    if (voltage <= Xsettenn){voltage = 0;} //校正した結果、0V以下になった際の処理
    average_voltage = voltage + average_voltage; //平均をaverage_voltageに加算
    average_count++; //平均の加算した数
    Serial.println(voltage);
    Serial.println(average_count);
  }
  /*
  Serial.print("voltage = ");
  Serial.println(voltage); //電圧値を出力
  Serial.print("flag = ");
  Serial.println(flag);
  Serial.print("command = ");
  Serial.println(command);
  */
  if(voltage <= 10.5){ //電圧降下時
    digitalWrite(switchPin, LOW);
    digitalWrite(Blue_LED, LOW);
    flag = 2;}
  else if(voltage >= 13.0 && flag == 2){ //電圧回復時
    flag = 0;}

  if(command == 1 && flag == 0){ //ONの指示時
    digitalWrite(switchPin, HIGH);
    digitalWrite(Blue_LED, HIGH);
    flag = 1;}
  else if(command == 0 && flag == 1){ //OFFの指示時
    digitalWrite(switchPin, LOW);
    digitalWrite(Blue_LED, LOW);
    flag = 0;}

  delay(1);
}
コードの説明
GPIO33にバッテリー電圧を測定して(もちろん抵抗で分圧してね)、GPIO18にリレーを接続して(もちろんトランジスタで増幅してね)放電のON/OFFをします。
10.5V以下になると放電ができなくなります。そして13Vになると再び放電ができるようになります。http://ipアドレス/onにアクセスすると放電用のリレーがオンにできます。http://ipアドレス/offにアクセスすると放電用のリレーをオフにできます。http://ipアドレス/onoff_statusにアクセスするとリレーがオンの時1、オフの時0が返ってきます。http://ipアドレス/voltageにアクセスするとjson形式で電圧が返ってきます。http://ipアドレス/statusにアクセスするとjson形式でバッテリーの残量(100×電圧/13.5)と低電圧かどうかの返答が返ってきます。
{
  "temperature": 10.8232317
}
{
"BatteryLevel": 34.47465897,
"LowBattery": 1
}Homebridge側の設定
今回使用したプラグインたち、はさまざまなアクセサリを追加できるhomebridge http advanced accessoryをバッテリーデバイスの追加に、温度計を追加できるhomebridge-http-temperatureを電圧計の追加に、スイッチの追加にhomebridge-http-switch使いました。homebridge http advanced accessoryは追加できるデバイスが多いだけあって、ちょっと設定が難しめなので、また別の機会に細かい説明を書こうと思います。そのため今回はConfigファイルだけ載せておきます。追加した部分だけ以下に載せました。
        {
            "accessory": "HttpTemperature",
            "name": "バッテリー電圧",
            "field_name": "temperature",
            "url": "http://ipアドレス/voltage"
        },
        {
            "accessory": "HTTP-SWITCH",
            "name": "バッテリー",
            "switchType": "stateful",
            "onUrl": {
                "url": "http://ipアドレス/on",
                "method": "GET"
            },
            "offUrl": {
                "url": "http://ipアドレス/off",
                "method": "GET"
            },
            "statusUrl": {
                "url": "http://ipアドレス/onoff_status",
                "method": "GET"
            }
        },
        {
            "accessory": "HttpAdvancedAccessory",
            "service": "Battery",
            "name": "鉛蓄電池",
            "forceRefreshDelay": 100,
            "debug": true,
            "optionCharacteristic": [
                "BatteryLevel"
            ],
            "urls": {
                "getBatteryLevel": {
                    "url": "http://ipアドレス/status",
                    "mappers": [
                        {
                            "type": "jpath",
                            "parameters": {
                                "jpath": "$.BatteryLevel",
                                "index": 0
                            }
                        }
                    ]
                },
                "StatusLowBattery": {
                    "url": "http://ipアドレス/status",
                    "mappers": [
                        {
                            "type": "jpath",
                            "parameters": {
                                "jpath": "$.LowBattery",
                                "index": 0
                            }
                        }
                    ]
                }
            }
        }
    ]
}ただ、これだとバッテリーがホームアプリで非対応と表示されてしまいます。理由は謎です。こんなプラグインを見つけたので、こちらに乗り換えるかもしれません。
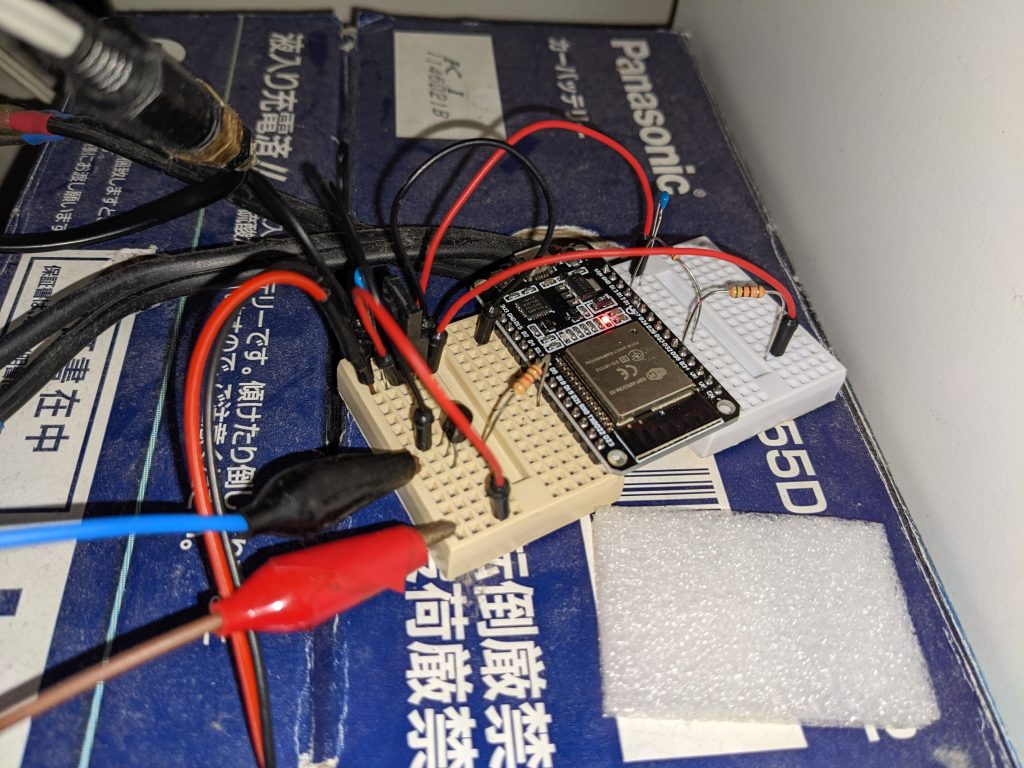
回路
電圧測定のための分圧と、リレー駆動用の増幅が必要になります。
上に記述したプログラムでは、分圧用の抵抗は510Ω(プラス側)と100Ω(マイナス側)を使用しています。ここらへんの電圧測定関係は以前の記事を参考にしてください。
リレーの増幅回路は適当に1kΩをつなげて2SC1815Yでやってます。
電源はバッテリーから持ってきているので三端子レギュレータで5Vにしています。ここは効率があまりよろしくないのでDCDCで12Vから3.3Vに降圧とかがいいかもですね(外部電源でもいいかも)
完成
ちょっとツイートから色々変更している...
HomeKit対応な鉛蓄電池用の放電コントローラを作成した
— Unagi Dojyou (@Unagi_Dojyou) September 16, 2022
電圧は温度として表示させてる pic.twitter.com/82OMW1fST4